Realtime Object Detection

Welcome to the era where machines have grown to see and understand the world around us. Real time Object Detection using Machine Learning is revolutionizing how we interact with technology, making our lives more efficient and secure. In this article, we will explore the technology’s applications, algorithms, and how real time object detection impact on various industries object. At the end of the article, we will learn how to make real time object detection in Python. Source code can also help you make a real time object detection project.
What is Real-Time Object Detection?
Real time object detection is a computer vision technique in which system helps to detect and locate the object in a video or image in real time. So, the existing system of real time object detection take more time and lack of speed to process input data and identifying the object. Traditional method require numerous passes over an image or video to detect object but this system used YOLO advanced algorithm. YOLO is more faster and efficient than typical object detection algorithms.
How Does It Work?
The magic behind real-time object detection lies in machine learning and computer vision. Convolutional Neural Networks (CNNs) algorithm play a important role in breaking down an image into smaller parts and analyzing them layer by layer to recognize patterns and features.
Applications of Realtime Object Detection
Enhancing Security with Surveillance Systems
In the realm of security, realtime object detection is a game-changer. From identifying intruders to detecting unusual behavior, this technology ensures swift response, reducing the risk of security breaches.
Revolutionizing Autonomous Vehicles
Autonomous vehicles heavily rely on real-time object detection to navigate through dynamic environments. From recognizing pedestrians to avoiding obstacles, this technology is the eyes and ears of self-driving cars.
Retail's Personal Shopping Assistant
In the retail sector, real-time object detection is transforming the shopping experience. Smart mirrors can suggest outfits based on a customer’s choice, utilizing this technology to identify clothing items and accessories in real-time.
Healthcare's Diagnostic Support
Within healthcare, real-time object detection aids in medical imaging, helping identify and diagnose conditions faster. From identifying tumors in X-rays to monitoring patient movements, the applications are vast.
Key Algorithms in Real-Time Object Detection
YOLO (You Only Look Once) Algorithm
The YOLO algorithm is a pioneer in realtime object detection, dividing an image into a grid and predicting bounding boxes and class probabilities for each cell simultaneously. This leads to speedy and accurate results.
Faster R-CNN (Region-based Convolutional Neural Network)
Faster R-CNN introduced Region Proposal Networks (RPN) to generate potential bounding box proposals, enhancing accuracy in object detection. This algorithm strikes a balance between speed and precision.
SSD (Single Shot Multibox Detector)
SSD is renowned for its efficiency, performing object detection in a single forward pass through a neural network. It utilizes multiple scales to detect objects of various sizes, making it robust and adaptable.
Realtime object Detection in Python
First you need to install required libraries and caffe model.Download Caffe Model
To make realtime object detection in python follow theses steps:
Step 1: Importing Libraries
				# import the necessary packages
from imutils.video import VideoStream
from imutils.video import FPS
import numpy as np
import argparse
import imutils
import time
import cv2
- This block imports necessary libraries for video processing and computer vision.
VideoStreamandFPSare from theimutilslibrary.numpyis imported asnp.argparseis used for command-line argument parsing.imutils,time, andcv2are standard libraries for image processing.
Step 2: Parsing Command-Line Arguments
				# construct the argument parse and parse the arguments
ap = argparse.ArgumentParser()
ap.add_argument("-p", "--prototxt", required=True,
    help="path to Caffe 'deploy' prototxt file")
ap.add_argument("-m", "--model", required=True,
    help="path to Caffe pre-trained model")
ap.add_argument("-c", "--confidence", type=float, default=0.2,
    help="minimum probability to filter weak detections")
args = vars(ap.parse_args())
- This block uses
argparseto handle command-line arguments. - Three arguments are defined:
-por--prototxt: Path to Caffe ‘deploy’ prototxt file (required).-mor--model: Path to Caffe pre-trained model (required).-cor--confidence: Minimum probability to filter weak detections (default is 0.2).
Step 3: Defining Classes and Colors
				CLASSES = ["background", "aeroplane", "bicycle", "bird", "boat",
    "bottle", "bus", "car", "cat", "chair", "cow", "diningtable",
    "dog", "horse", "motorbike", "person", "pottedplant", "sheep",
    "sofa", "train", "tvmonitor"]
COLORS = np.random.uniform(0, 255, size=(len(CLASSES), 3))
- This block defines a list of class labels (
CLASSES). - Random RGB colors are generated for each class and stored in
COLORS.
Step 4: Loading Caffe Model
				# load our serialized model from disk
print("[INFO] loading model...")
net = cv2.dnn.readNetFromCaffe(args["prototxt"], args["model"])
- The pre-trained Caffe model is loaded using
cv2.dnn.readNetFromCaffe. - The paths to the prototxt file and the model file are obtained from the command-line arguments.
Step 5: Initializing Video Stream and FPS Counter
				# initialize the video stream, allow the camera sensor to warm up,
# and initialize the FPS counter
print("[INFO] starting video stream...")
vs = VideoStream(src=0).start()
time.sleep(2.0)
fps = FPS().start()
- Video stream is initialized using
VideoStreamwith the default camera source (src=0). - There is a 2-second delay (
time.sleep(2.0)) to allow the camera sensor to warm up. - FPS counter (
fps) is initialized.
Step 6: Main Loop for Video Processing
				# loop over the frames from the video stream
while True:
    # grab the frame from the threaded video stream and resize it
    # to have a maximum width of 400 pixels
    frame = vs.read()
    frame = imutils.resize(frame, width=400)
    # grab the frame dimensions and convert it to a blob
    (h, w) = frame.shape[:2]
    blob = cv2.dnn.blobFromImage(cv2.resize(frame, (300, 300)),
        0.007843, (300, 300), 127.5)
    # pass the blob through the network and obtain the detections and predictions
    net.setInput(blob)
    detections = net.forward()
- The main loop iterates over frames from the video stream.
- Each frame is resized to have a maximum width of 400 pixels.
- A blob is created from the resized frame for further processing.
- The blob is passed through the neural network, and detections and predictions are obtained.
Step 7: Loop Over Detections and Drawing Bounding Boxes
# loop over the detections
for i in np.arange(0, detections.shape[2]):
# extract the confidence (i.e., probability) associated with the prediction
confidence = detections[0, 0, i, 2]
# filter out weak detections by ensuring the `confidence` is greater than the minimum confidence
if confidence > args["confidence"]:
# extract the index of the class label from the `detections`,
# then compute the (x, y)-coordinates of the bounding box for the object
idx = int(detections[0, 0, i, 1])
box = detections[0, 0, i, 3:7] * np.array([w, h, w, h])
(startX, startY, endX, endY) = box.astype("int")
# draw the prediction on the frame
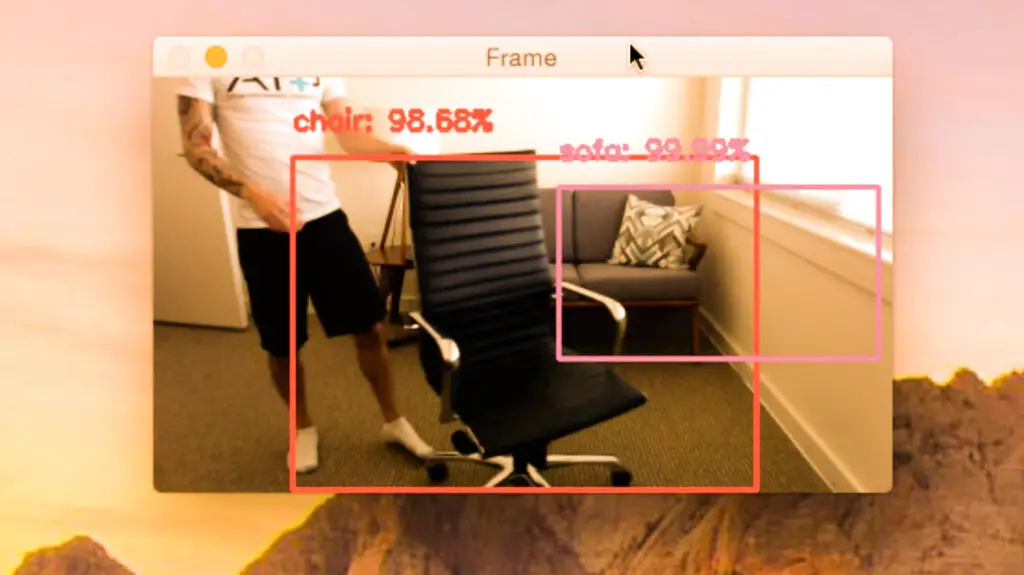
label = "{}: {:.2f}%".format(CLASSES[idx], confidence * 100)
cv2.rectangle(frame, (startX, startY), (endX, endY), COLORS[idx], 2)
y = startY - 15 if startY - 15 > 15 else startY + 15
cv2.putText(frame, label, (startX, y), cv2.FONT_HERSHEY_SIMPLEX, 0.5, COLORS[idx], 2)
# show the output frame
cv2.imshow("Frame", frame)
key = cv2.waitKey(1) & 0xFF
# if the `q` key was pressed, break from the loop
if key == ord("q"):
break
# update the FPS counter
fps.update()
- This block loops over the detections obtained from the neural network.
- Weak detections (based on confidence threshold) are filtered out.
- Bounding boxes are drawn on the frame for the detected objects, along with class labels and confidence percentages.
- The frame is displayed, and user input is checked to break out of the loop if the ‘q’ key is pressed.
Step 8: Updating and Displaying FPS Information
				# stop the timer and display FPS information
fps.stop()
print("[INFO] elapsed time: {:.2f}".format(fps.elapsed()))
print("[INFO] approx. FPS: {:.2f}".format(fps.fps()))
The FPS counter is stopped, and elapsed time and approximate FPS are printed to the console.
Step 9: Cleanup
				# do a bit of cleanup
cv2.destroyAllWindows()
vs.stop()
- OpenCV windows are closed.
- Video stream is stopped, and resources are released.
Output
In conclusion, real-time object detection using machine learning is not just a technological wonder; it’s a transformative force across various industries. From maintaining security to enhancing our shopping experiences, the applications are limitless. As algorithms evolve, overcoming challenges like perplexity and burstiness, we can expect even more breakthroughs, making our world brighter and safer.
To learn more about realtime object detection
Real-time object detection is incredibly fast, often processing video feeds at several frames per second, allowing for instant analysis and response.
Yes, many real-time object detection models are optimized for mobile devices, making them suitable for applications like augmented reality and mobile photography.
While commonly used in images and videos, real-time object detection can also be applied to live camera feeds and streaming data, extending its applications to real-time monitoring.

Final Year Projects

Data Science Projects

Blockchain Projects

Python Projects

Cyber Security Projects

Web dev Projects

IOT Projects

C++ Projects
-
Where Do YouTubers Get Their Music?
-
Top 20 Machine Learning Project Ideas for Final Years with Code
-
Why Creators Choose YouTube: Exploring the Four Key Reasons
-
10 Advance Final Year Project Ideas with Source Code
-
10 Deep Learning Projects for Final Year in 2024
-
Realtime Object Detection
-
AI Music Composer project with source code
-
30 Final Year Project Ideas for IT Students
-
E Commerce sales forecasting using machine learning
-
Stock market Price Prediction using machine learning
-
c++ Projects for beginners
-
Python Projects For Final Year Students With Source Code
-
20 Exiciting Cyber Security Final Year Projects
-
10 Web Development Projects for beginners
-
Top 10 Best JAVA Final Year Projects
-
Fake news detection using machine learning source code
-
15 Exciting Blockchain Project Ideas with Source Code
-
C++ Projects with Source Code
-
Artificial Intelligence Projects For Final Year
-
Best 21 Projects Using HTML, CSS, Javascript With Source Code
-
Hand Gesture Recognition in python
-
Credit Card Fraud detection using machine learning
-
How to Download image in HTML
-
How to Host HTML website for free?
-
Hate Speech Detection Using Machine Learning
-
10 advanced JavaScript project ideas for experts in 2024
-
Python Projects For Beginners with Source Code
-
Best Machine Learning Final Year Project
-
20 Advance IOT Projects For Final Year in 2024
-
Top 7 Cybersecurity Final Year Projects in 2024
-
Plant Disease Detection using Machine Learning
-
Data Science Projects with Source Code
-
Ethical Hacking Projects
-
10 Exciting C++ projects with source code in 2024
-
Artificial Intelligence Projects for the Final Year
-
Best 13 IOT Project Ideas For Final Year Students
-
Top 13 IOT Projects With Source Code
-
portfolio website using javascript
-
Phishing website detection using Machine Learning with Source Code
-
17 Easy Blockchain Projects For Beginners
-
10 Exciting Next.jS Project Ideas
-
Fabric Defect Detection
-
Heart Disease Prediction Using Machine Learning
-
How to Change Color of Text in JavaScript
-
Wine Quality Prediction Using Machine Learning
-
Diabetes Prediction Using Machine Learning
-
10 Final Year Projects For Computer Science With Source Code
-
Car Price Prediction Using Machine Learning
-
10 TypeScript Projects With Source Code
-
Step-By-Step Complete Guide Of Freelance Visa Abu Dhabi In 2024
